|
|

|
| Global switches for additional rendering effects are found on the right side of the render options dialog.
|
|
|
| If you take a picture with a real camera it can be flawed by camera-optics. If, for example, a light-source shines directly into a camera, several reflections can be produced within the lens. This is responsible for the well-known star, circle, or annular light reflections in the pictures. The photo and film-industry, however, do not always view this effect with pleasure and go to considerable length to avoid it. On other situations, however, these effects are deliberately aimed for and highlighted. In the meantime, every movie fan has become so accustomed to these picture faults that, by using these effects, you can considerably increase the degree of reality in computer-generated pictures. You can determine if and how a light source produces lens reflections with a great number of different parameters for each individual light source in the Light dialog.
|
| Here, in the picture-parameter dialog, the calculation of these light effects can only be switched on or off globally with the <Lens Flares> button.
|
|
|
| If you have defined particle actions in the particle-editor, you can specify with the <Particle-System> button, if the particles are calculated for (Preview-) animations or not.
|
|
|
| Usually the bones of a skeleton are only visible in the viewport windows - in the final rendering skeletons are hidden automatically. However, if you want to include bones also in the final rendering of a film, then just switch on the <Bones> button in the Render Options dialog.
|
|
|
| Switching on this option includes a starry sky in the picture calculations. This starfield can be animated or even combined with other background models (e.g. a starry sky filtered through a cloud cover). The adjustments for the starfield are defined in the starfield-editor.
|
|
|
| With the <Object Halo> button you can switch off or on the halo effect for all objects simultaneously. This effect creates a halo of light enveloping the outline of an object and can be used to simulate atmospheric halos around planets or, for instance, to create swirling swarms of glowing particles. The parameters for object halo are edited in the material editor.
|
|
|

|
| Switch on the option <Volumetric Spotlight> to render a realistic light-cone (not available in scanline-mode). Each spotlight that has been switched on then throws a cone of light in which spotlight-parameters (such as edge-interpolation and distance-dependent intensity sensitivity) are taken into consideration. Shadows from objects penetrating the cones, and filtering of the spot cone light through transparent objects are also possible, although very calculation-intensive. In order to render these silhouettes in the visible light-cone, they are referred to in a volume rendering process that senses the inside of the light-cone and - depending on the accuracy required - requires a large amount of calculation time.
|
| There are two parameters with which you can determine the intensity and the accuracy of the volume-calculation of the cone:
|
| Diffuse Reflection: A visible light-cone originates if there are particles that reflect the light of the spotlamp - such as, for example, dust or smoke in the area. With the <Diffuse Reflection> parameter you determine the reflectivity of these imaginary particles, and thus the brightness, with which the light-cone is calculated.
|
| Resolution: This value defines the accuracy of the light-cone scan. If no objects are within the light-cone (so no complicated shadows need to be calculated) a value of 0.10- 0.20 is entirely sufficient. However, the value should be as high as possible with shadow-calculations. The value also depends somewhat on the spread-angle of the spotlight. A wide spread signifies a wide spot cone so the scan rate must also be higher if you want to obtain sensible results. The narrower the spot cone, the lower can be the resolution parameter chosen. In order to save calculation time, the <No Shadow> button can be switched on in the light dialog for all spots that do not throw a shadow.
|

|
| Example: The illustration shows a simple house wall with 2 windows, behind which is a spotlight source with visible light-cones. A colored bitmap with transparency has been projected onto the transparent panes, so that the four windowpanes filter the light falling through them by different amounts.
|
|
|

|
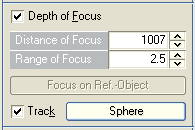
| Depth of focus is another effect that is used in film and photography to accentuate areas of a picture. With depth of focus switched on only picture-regions at a specific distance are sharp, and picture-regions that lie nearer or further away become increasingly more blurred.
|
| Distance of Focus: With this parameter you can specify the precise distance at which the picture is sharpest. If, for example, a value of 1000 units is put in here, an object that is at this precise distance from the camera is represented with completely sharpness. Objects that are before or behind this object are represented less sharply with increasing distance from this point.
|
| Range of Focus: With this parameter you can decide how great the area of focus will be, with respect to how rapidly the sharpness falls off with increased distance from the focus point. With a very small value (minimum 1) only a very small area about the focus is sharply represented and the sharpness falls off rapidly. With a greater value you can increase the area of sharpness and reduce the rate at which the sharpness falls off.
|
|
|
| Focus on Reference Object - It is not necessary to work out the relationship between the camera and an object in order to determine the precise focal distance. Simply mark the object you want to focus as a reference-object in the viewport window and then, back in the Render Options dialog again, operate the <Focus on Ref.-Object> button. The distance of the camera from the reference-object is automatically calculated and noted.
|
|
|
| Animated Depth of Focus - If you switch on the <Track> button then the program calculates automatically the focal distance to a reference object that you can choose in an object selection box, which appears when you select the button next to the <Track> button. In each frame of an animation this reference object will be used to calculate the sharpness distance. A Group Object is best suited for this purpose, since Group Objects are only drawn in the viewport windows - in the final rendering they are always hidden.
|

|
| Example: In the left picture the sphere lying at the back was chosen as the focus, while in the right picture the sphere at the front was the focus.
|
|
|

|
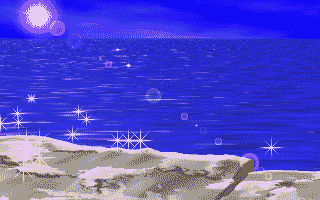
| Sparkles are star-like lens reflections that appear if light reflects from a shiny object into the lens of a camera. For this, the object must be shiny, and at the same time sparkle must be globally switched on in the rendering dialog. If you switch on the sparkle option, you can render sparkle dancing on waves as shown in the above picture. The following parameters can be inserted:
|
| Size: The basic size of the sparkles can be entered - the size at which they are rendered, however, is dependant on the distance and also intensity of the shine.
|
| Threshold: Here you can set a threshold value between 0.1 and 1 that corresponds to the minimum intensity of the light that must be reflected from an object before sparkle is calculated.
|
|
|
|
|
|
|
|
|
|
|


